Questions about a part or how to install it? Give us a shout!
Read this guide to find clear instructions on how to mount your HDB Ultimate Hand Guard!

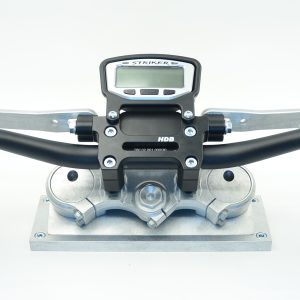
1 – HDB Top Clamp,
1 – Pair of HDB Ultimate Handguards,
1 – Pair of Plastic Shields,
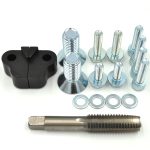
2 – Swivel Bosses,
2 – Threaded Inserts,
1 – 5/8-11 tap,
4 – 8mm x 35mm SHCS,
2 – 8mm x 30mm BHCS and washers,
2 – 8mm x 20mm BHCS w/ washers,
2 – 8mm x 40mm FHCS,
4 – 5mm x 16mm BHCS w/ washers,
Mirrors are optional.
Note: The set does not come with a black anodized top clamp. Instead, it is a bare-top clamp.

If you have grips on your bars, remove them and prep the ends for handguards by trimming the ends out of both sides and also the throttle tube. This needs to be done to ensure metal-to-metal contact of the handguards and handlebars

Tap the handlebar ends for threaded inserts, using an 11mm 12-point socket for the square end of the tap and WD-40 or equivalent for a lubricant, run the tap into the end of the threads. For best results keep the centerlines of the tap and the bars aligned, turn the tap one revolution clockwise before turning at least one revolution counterclockwise to break the chip, if the taps binds, back it out and blow out the shavings and continue.

Use blue Loctite to glue in the inserts.

Install the threaded inserts so they are inside the bars by about 1/32″


Remove the old top clamp and install HDB Top Clamp using the 4-8mm x 35mm SHCS (you might find it easier to attach the Computer Protector, Computer, and Swivel Bosses before bolting the HDB Top Clamp to lower handlebar clamps).


Attach Swivel Bosses to Top Clamp using the 2-8mm x 30mm BHCS and washers, tighten until snug then back off 1-2 turns.


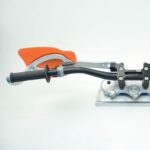
Attach the swivel end of the Handguards to the Swivel Bosses using the 2-8mm x 20mm BHCS and washers, tighten till snug then back off 1-2 turns.

Attach the bar ends of the Handguards using the 2-8mm x 40mm FHCS and tighten in desired position. In some cases, because of the different bends and raises of bars, there will be a gap that will need to be tightened up.

Tighten the bar end to its final position.


Attach Shields using the 4-5mm x 16mm BHCS and washers. For best results, get both screws started before tightening.
Last and most important thing before you go out there in the wilderness with your brand new ultimate handguards – Check and tighten all bolts one last time.

Attach optional Mirrors if included using the M5 x 25mm SHCS, Nyloc nut, and washer. For best results, tighten the mirrors M5 SHCS, then place the shield on the threads extending from the guards and get shields other BHCS started before tightening.
If more adjustment is desired from the mirrors it is possible to drill out the mounting hole the M5 SHCS goes through to allow more movement in the mirror to the handguard joint.
Thanks,
Chad from HDB
Still need more info? Jump over to our contact page to reach out to customer support.